
CSS Snipplets for TextMate
I’m a fan of TextMate and how easy it is to extend the functionality. You can write TextMate plugins in ruby or any other language. But today I want to show you two simple snipplets I use in my everyday life.
TextMate snipplets have a great feature: the repeater—each time you type, TextMate retypes the character at another place. You can set them up like:
I have 2 red $1 and 5 green $1.
When you add a tab trigger (p. e. “ihave” + TAB) TextMate inserts the text and places the cursor at $1. While you’re typing “apples” the same text (“apples”) will appear at the second $1 position.
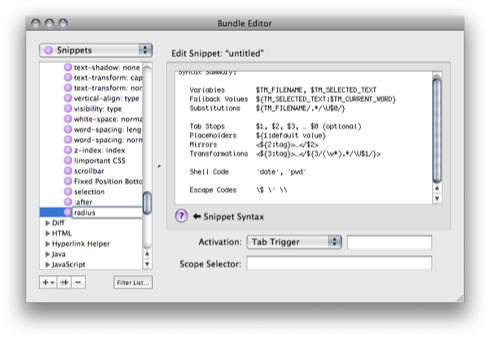
For those who are not familiar with snipplets yet: You can add an snipplet just as easy as:
- Go to Bundles > Bundle Editor > Show Bundle Editor
- Choose the language (“CSS” in our case)
- Click at the plus button in the lower left and choose New Snipplet
- Choose Activation: “Tab Trigger” and type in “ihave” in the field at the right side
- Be sure to click anywhere else in the list on the left side—TextMate saves your changes when you leave the new snipplet
So here’s the first example:
1. Border Radius for Safari and Firefox
If you want to use the CSS 3.0 feature border-radius you have to do this several times to tell all the browsers—OK, currently only Safari and Firefox will support it:
.radius-test {
  -moz-border-radius: 12px;
  -webkit-border-radius: 12px;
  -khtml-border-radius: 12px;
  border-radius: 12px;
}
Insteat of typing all this you can use a snipplet:
-moz-border-radius: $1px;
-webkit-border-radius: $1px;
-khtml-border-radius: $1px;
border-radius: $1px;
By the way: TextMate will choose the right indentation automatically. Your bundle editor should like this:
2. Clearfix
This clearfix will expand a box without float to the height of all children—even if the have floats.
/** For all browsers except IE6 **/
.clearfix:after {
clear: both;
content: "."
;
display: block;
height: 0;
visibility: hidden;
}
/** For IE6 **/
.clearfix {
_height: 1%;
}
My snipplet contains everything in one line because I wouldn’t change anything. As a tab trigger name I chose :after.
$1:after{clear:both;content:"."
;display:block;height:0;visibility:hidden;}$1{_height:1%;}
Whatever class or element you type at the beginning, it will be repeated for the IE6 block.
I hope this was usefull and inspires you for your own snipplets.